Iron Fish Wallet: A Step-by-Step Guide to Securely Managing Your $IRON in 2026

This guide walks you through a beginner-friendly way to manage your $IRON in 2026 using FoxWallet, a multi-chain, non‑custodial wallet that already supports Iron Fish on both mobile and browser extension. You will learn what Iron Fish is, why FoxWallet is a strong fit, and exactly how to set it up step by step.Iron Fish gives you powerful privacy, but its wallets can feel overwhelming if you are new to Web3. Full nodes, command lines, view keys, and complex setup flows are a lot to handle when you “just want a simple ironfish wallet on your phone or browser.”

Understanding Iron Fish and Its Wallet Choices
What makes Iron Fish different?
Iron Fish is a Layer‑1 proof‑of‑work blockchain designed for end‑to‑end private transactions. Every transfer is encrypted by default using zk‑SNARKs, so:
- Sender, recipient, amount, and asset type are hidden.
- Transactions are still verifiable on‑chain.
That privacy is powerful, but it introduces concepts that typical Ethereum or Bitcoin users have never seen:
- View keys that can see transaction history without spending.
- Fully shielded transactions instead of transparent explorers.
- Extra scanning logic so a wallet can find “your” notes on the chain.
Because of this, traditional single‑chain tools like full nodes and command‑line wallets can feel too technical for Web3 beginners.
The main Iron Fish wallet options today
As of 2026, the Iron Fish ecosystem includes several wallet types:
- CLI / Wallet CLI tools
Theironfish-wallet-clion GitHub gives you full control from the command line: create wallets, export keys, send transactions. It is flexible but very technical and error‑prone for non‑developers. - Multi‑chain wallets
FoxWallet stands out here: it supports 100+ chains (including Iron Fish) in a single non‑custodial app on iOS, Android, and as a browser extension. You get a unified view of all your chains and assets, including $IRON. - Exchange accounts (custodial)
Some exchanges (such as CoinEx) list Iron Fish so you can buy or trade $IRON. However, these accounts are custodial: the platform holds the keys for you, so you do not get the full self‑custody and privacy benefits.
For Web3 beginners, the main choice is usually between:
- Heavy but “official” node tools, or
- Light, user‑friendly wallets that hide complexity.
The rest of this guide will focus on the second path, using FoxWallet.
Why FoxWallet Is a Beginner-Friendly Ironfish Wallet in 2026
Full user control with non‑custodial security
FoxWallet is built as a non‑custodial wallet:
- Your mnemonic phrase and private keys are encrypted and stored locally on your device.
- FoxWallet does not hold or access your funds.
- There is no central account that can be frozen or lost; you control everything via your seed phrase.
This design lines up perfectly with Iron Fish’s goal of censorship‑resistant, private payments. You get privacy at the protocol level and self‑custody at the wallet level.
Multi‑chain asset management in one place
Iron Fish is rarely the only chain you use. Most users also hold BTC, ETH, stablecoins, or NFTs on other networks.
FoxWallet is designed for exactly that reality:
- One wallet, one seed phrase, multiple chains.
- Automatic detection of supported chains and many tokens.
- A unified portfolio view so you can see your $IRON alongside other assets instead of juggling many single‑purpose apps.
That matters for Web3 beginners: Iron Fish becomes “just another chain” in the same simple interface, instead of a completely separate world with its own tools and rules.
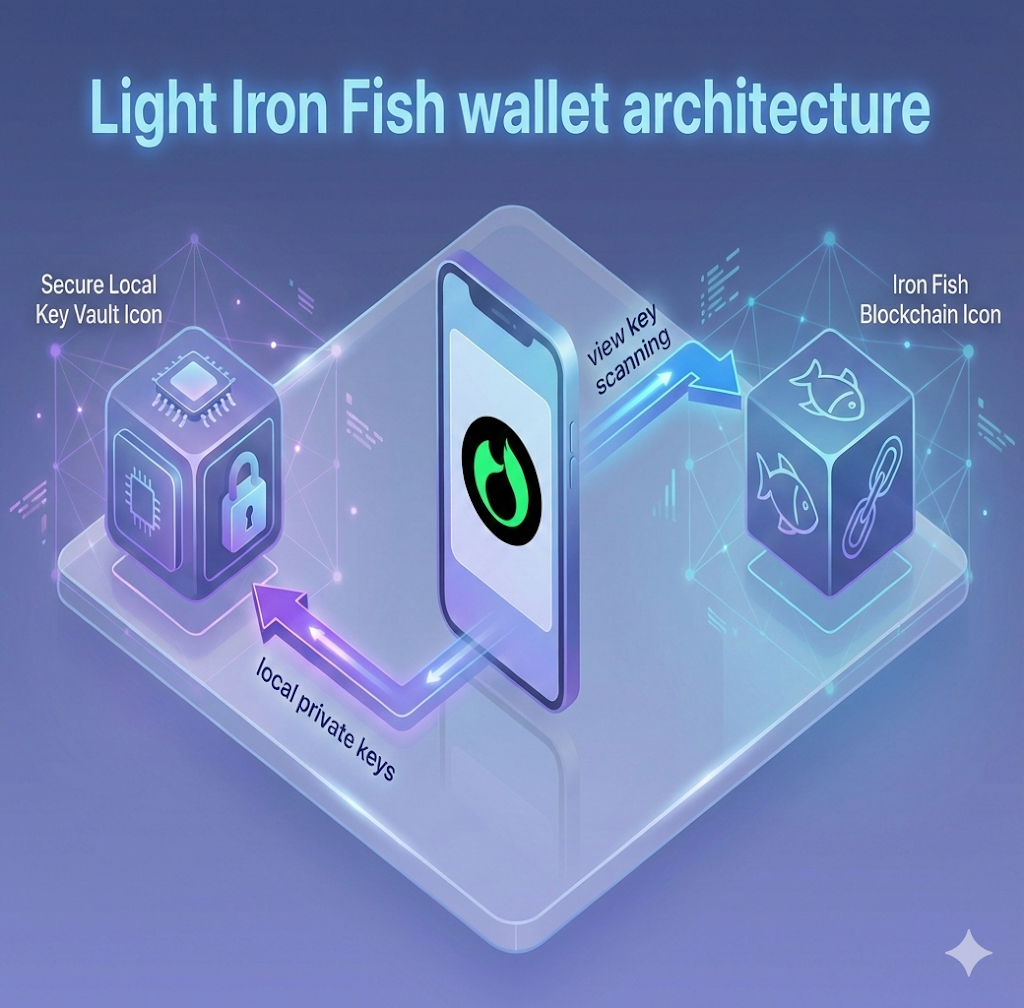
Light Iron Fish integration: no node, no CLI
Iron Fish’s own docs highlight FoxWallet as the first Iron Fish light wallet. Instead of making you run a full node, FoxWallet:
- Derives your Iron Fish keys when you enable the Iron Fish network.
- Uses a view key plus FoxWallet’s backend indexer to scan the Iron Fish blockchain and show your balances and history.
- Stores your spending keys locally, so the backend cannot move your funds.
You get:
- Iron Fish privacy and self‑custody.
- A simple mobile or browser UI.
- No need to touch command lines or heavy desktop nodes.
Step-by-Step: Setting Up FoxWallet as Your Iron Fish Wallet
This section walks you through a realistic beginner journey: creating an ironfish wallet in FoxWallet, receiving your first $IRON, and sending a private transaction.
You can use either:
- mobile app (iOS or Android)
The basic flow is the same.
1. Install FoxWallet
On mobile:
- Open your app store and search for “FoxWallet – Secure Crypto Asset”.
- Confirm the publisher and install the official app.
- Open FoxWallet once installation finishes.
2. Create or import your wallet
When FoxWallet opens for the first time, you will be asked to create or import a wallet.
Create a new multi‑chain wallet
- Choose Create new wallet.
- FoxWallet will generate a mnemonic seed phrase (typically 12 or 24 words).
- Carefully write the phrase on paper and store it offline.
- Do not screenshot it.
- Do not upload it to cloud storage or send it to yourself in chat apps.
- Confirm the phrase as prompted (for example by re‑entering or tapping words in order).
- Set a local password, PIN, or biometric lock for the app.
Your multi‑chain wallet is now ready. The same seed can derive addresses for Iron Fish and many other blockchains.
Import an existing Iron Fish wallet
If you already used the Iron Fish Node App or CLI and have a mnemonic:
- Choose Import seed wallet.
- Select the option to import via seed phrase.
- Enter your Iron Fish mnemonic carefully, in the correct word order.
- Confirm and set a local password or PIN.
FoxWallet will derive compatible keys and later show your Iron Fish balances once you enable the network.
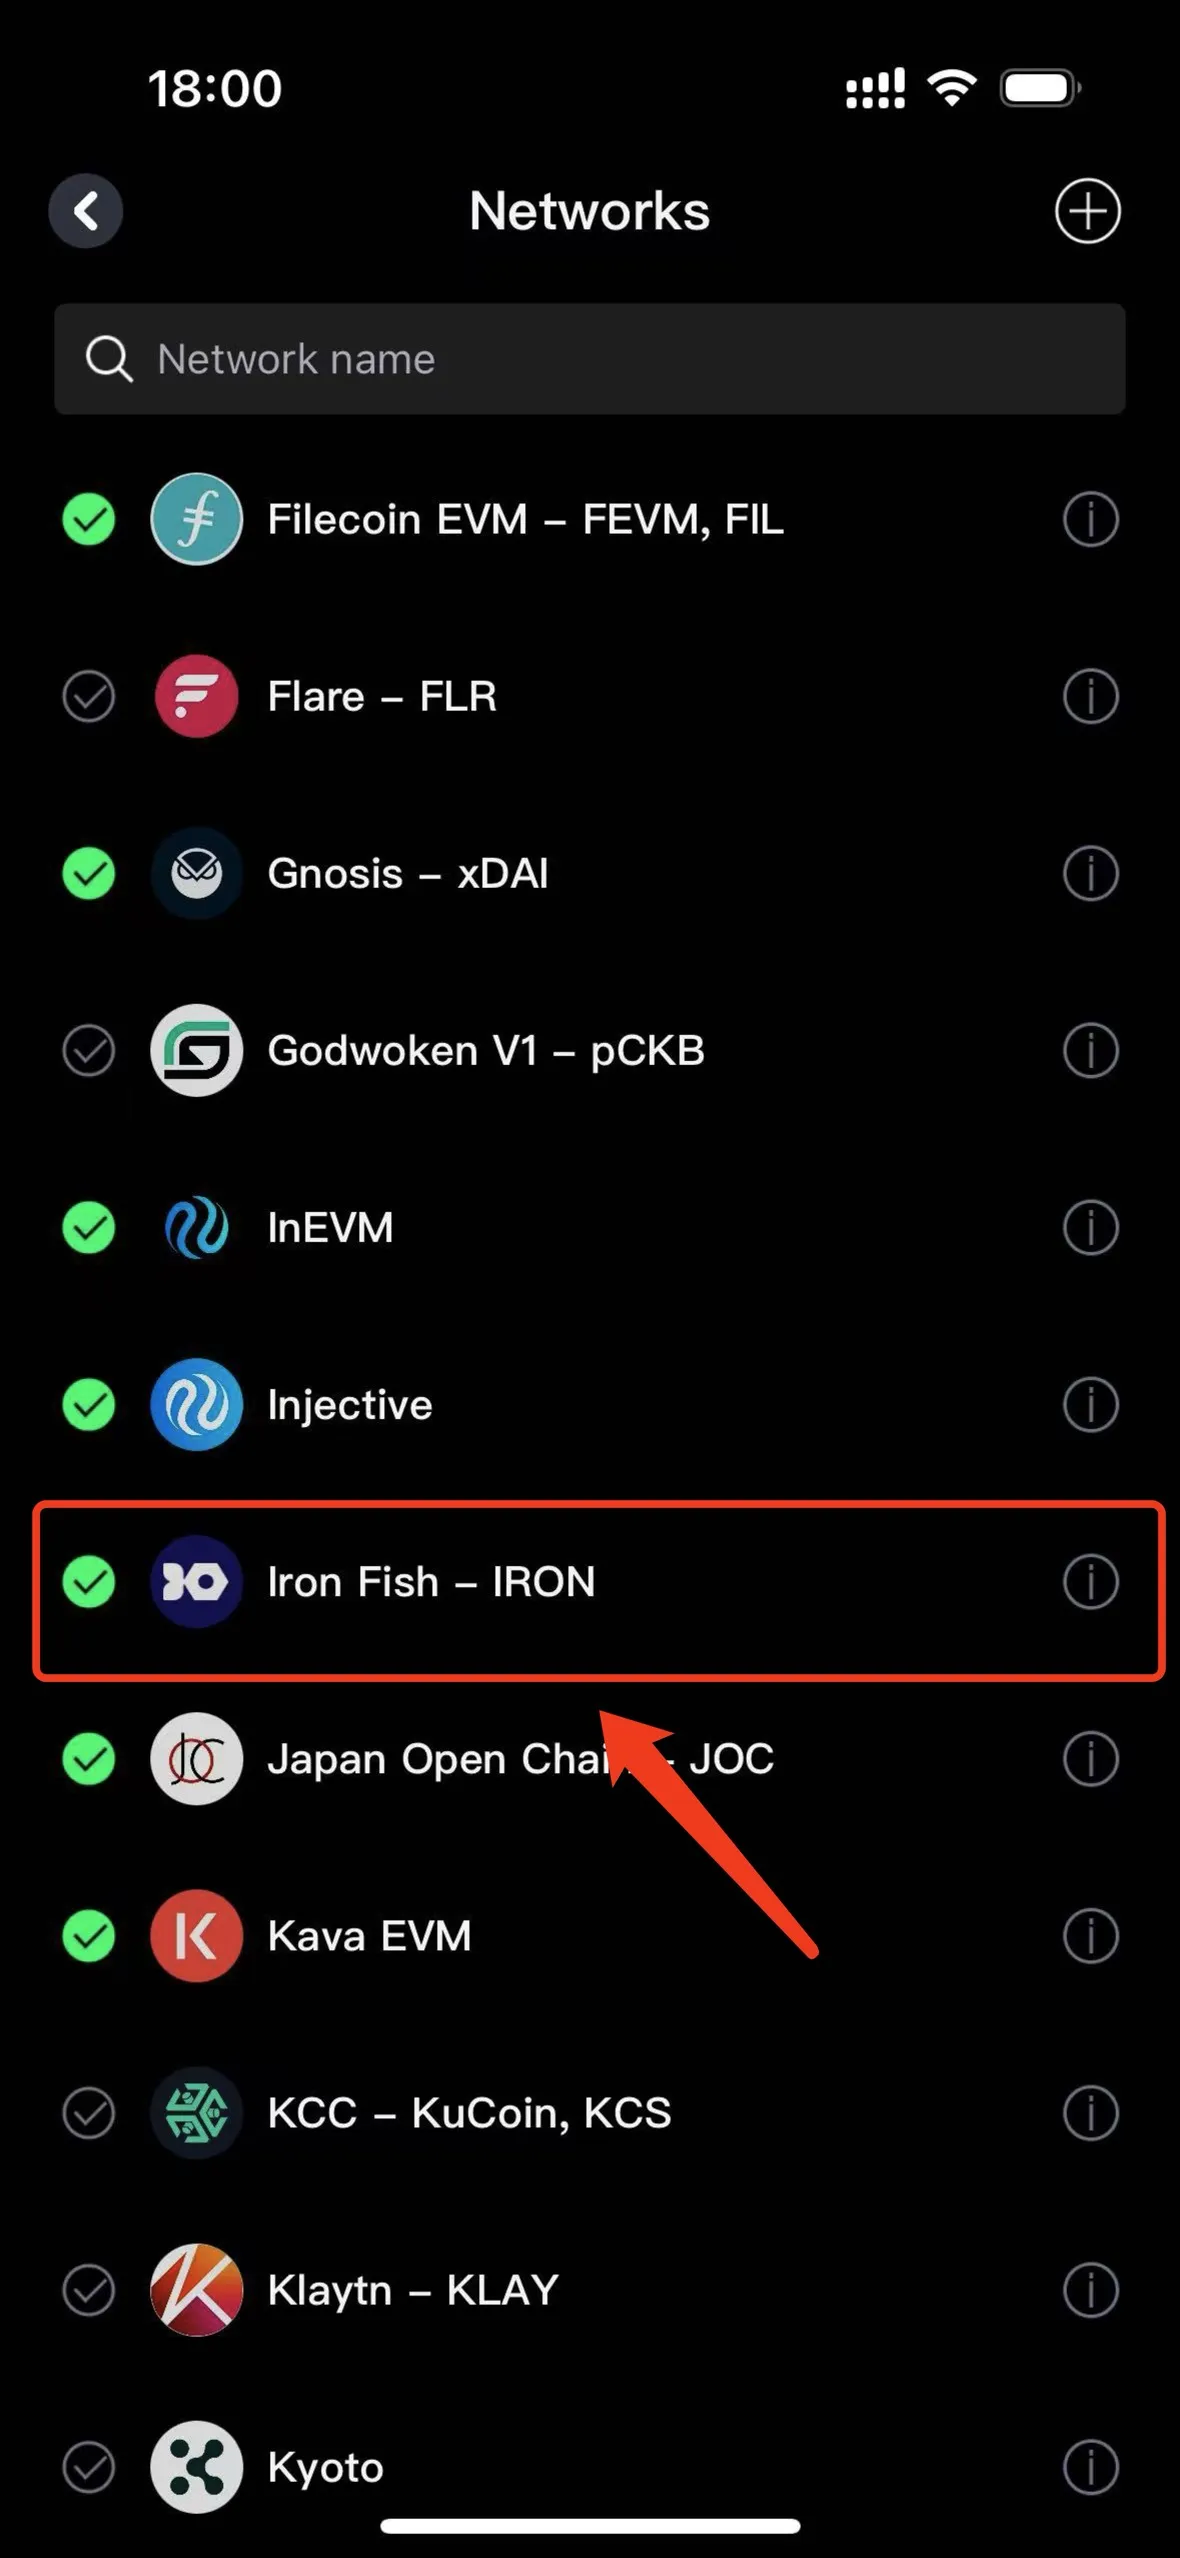
3. Enable the Iron Fish network
By default, FoxWallet focuses on popular chains, but adding Iron Fish is straightforward.
- Open Settings or the Networks section.
- Find Iron Fish in the list of supported networks.
- Toggle Iron Fish on.
Behind the scenes, FoxWallet:
- Derives an Iron Fish address from your seed (or uses the imported one).
- Syncs your view key with its indexer so it can find your existing notes and show your balance.
- Connects to pre‑configured Iron Fish RPC endpoints.
You do not need to:
- Enter custom RPC URLs.
- Download blockchain data manually.
- Run an Iron Fish node.
4. Receive your first $IRON
To receive funds:
- In your asset list, tap or click Iron Fish.
- Choose Receive.
- You will see:
- Your Iron Fish address (text).
- A QR code for easy scanning.
- Copy the address and send it to the friend, exchange, or service that will deposit $IRON for you.
From an exchange:
- In the exchange app, go to the withdraw section for Iron Fish.
- Paste your FoxWallet Iron Fish address.
- Double‑check that the network is set to Iron Fish mainnet.
- Start with a small test withdrawal to confirm everything works.
Once the transaction confirms on the Iron Fish blockchain, FoxWallet will show an updated balance and a new transaction in your history.
5. Send a private Iron Fish transaction
When you are ready to send:
- Open FoxWallet and select Iron Fish from your assets.
- Tap or click Send.
- Enter:
- The recipient’s Iron Fish address.
- The amount of $IRON to send.
- Review:
- Network fee (usually small).
- Destination address (double‑check, especially if pasted).
- Confirm the transaction with your password, PIN, or biometric.
FoxWallet will:
- Build and sign the Iron Fish transaction locally using your spending key.
- Broadcast it to the network via Iron Fish RPC.
- Update the status as it gets included in a block.
For most users, the whole flow feels like sending any other crypto asset, even though Iron Fish is using advanced privacy tech under the hood.
Managing and Securing Your IRON in FoxWallet
Once your ironfish wallet is live in FoxWallet, you will mainly care about three things: understanding your keys, checking balances and history, and staying safe.
Understanding seed phrases, spending keys, and view keys
Iron Fish’s privacy model uses two main types of keys:
- Spending key / secret key
This is what actually allows a wallet to move your funds. If someone gets this, they can spend your $IRON. - View key
This can see your Iron Fish transaction history and balances, but cannot spend funds.
FoxWallet manages these safely:
- Your seed phrase on first setup can generate both spending keys and view keys.
- Your spending keys remain encrypted locally in the app.
- FoxWallet can send your view key to its backend indexer so it can find your notes and display your history without exposing spending control.
For beginners, the most important rule is simple:
Protect your seed phrase and never share it.
Treat it as more sensitive than passwords or 2FA codes.
If you lose it, no one (including FoxWallet) can restore access to your funds.
Day‑to‑day use: balances, history, and multi‑chain view
FoxWallet is designed as a “unified asset gateway”:
- On the home screen, you can usually see:
- Total portfolio value across all chains.
- A list of assets, including your Iron Fish balance.
- When you tap into Iron Fish, you see:
- Your current $IRON balance.
- A transaction history that explains each movement in human terms (date, direction, status).
You do not need to understand notes, commitments, or zk‑proofs to track what is happening; FoxWallet handles that behind the scenes.
Security best practices for Iron Fish in FoxWallet
To keep your ironfish wallet safe:
- Secure your device
- Use OS‑level screen locks and biometric protection.
- Keep your mobile OS and browser up to date.
- Lock the wallet itself
- Enable FoxWallet’s PIN, password, or biometric lock.
- Do not leave your device unlocked and unattended.
- Avoid phishing
- Only download FoxWallet from official app stores or foxwallet.com.
- Be cautious of links in emails, DMs, or pop‑ups that ask you to enter your seed phrase.
- Never type your seed phrase into a website form.
- Back up offline
- Store your seed phrase in at least two secure physical locations (for example, two separate paper backups).
- Consider a fireproof safe or similar for long‑term storage.

Common Questions and Troubleshooting for Iron Fish Beginners
“My $IRON deposit is not showing in FoxWallet. What should I check?”
Go through this checklist:
- Confirm the network
Make sure the exchange or sender used Iron Fish mainnet, not any other chain. - Match the address
Compare the address in the sender’s history with your FoxWallet Iron Fish receive address. They must be identical. - Allow for confirmations
Wait a few blocks. Iron Fish is proof‑of‑work, so confirmations are not instant. - Refresh FoxWallet
Reopen the app or refresh the extension. FoxWallet’s indexer may need a moment to sync new notes.
If the transaction appears on an Iron Fish explorer but not in your wallet for an extended period, verify you restored or created the correct wallet and address.
“How do I move $IRON from an exchange into self‑custody with FoxWallet?”
- Set up FoxWallet and enable the Iron Fish network as described above.
- In FoxWallet, copy your Iron Fish receive address.
- On the exchange, go to Withdraw for Iron Fish.
- Paste your FoxWallet address, pick a small test amount, and confirm.
- Once it arrives, you can withdraw larger amounts.
Always test with a small transaction first, especially when using a chain for the first time.
“Can I use FoxWallet both on mobile and in my browser?”
Yes. Many users:
- Create or import their wallet (seed phrase) on one device.
- Then import the same seed phrase into FoxWallet on another device.
Because FoxWallet is non‑custodial, syncing is done through the seed and on‑chain data, not through a central account. Just be sure every device that holds your seed is physically secure and malware‑free.
“Do I still need the Iron Fish Node App or CLI?”
Not necessarily.
- If you are a beginner who only wants to hold, send, and receive $IRON on phone or browser, FoxWallet is usually enough.
- If you want to:
- Run a full node,
- Participate in advanced protocol operations, or
- Integrate Iron Fish into your own infrastructure,
Many advanced users choose a hybrid approach: FoxWallet for everyday use and a node/CLI for advanced tasks.
FoxWallet’s multi‑chain, non‑custodial design turns the complex world of Iron Fish into something Web3 beginners can use with confidence. You keep full control over your keys, manage $IRON alongside your other assets, and avoid the heavy setup of full nodes and command‑line tools.
To start managing your ironfish wallet more simply in 2026 and beyond, visit foxwallet.com on your preferred device and follow the steps in this guide to get set up in minutes.
More details please refer https://hc.foxwallet.com/docs/ironfish/